

Úvod do GridLayout v Jave
Manažéri rozloženia sa používajú v grafickom programovaní na usporiadanie komponentov špecifickým spôsobom. Používajú sa na určenie veľkosti a polohy komponentu v kontajneri. K dispozícii sú rôzne typy manažérov rozloženia. GridLayout je jedným z nich. GridLayout v Java rozdeľuje kontajner do mriežky buniek nazývaných riadky a stĺpce. Usporiada komponenty do pravouhlej mriežky. Každá bunka môže pojať iba jednu zložku, rovnako veľkých a vyrovnaných.
Príklad: 3 riadky a 4 stĺpce
| 1 | 2 | 3 | 4 |
| 5 | 6 | 7 | 8 |
| 9 | 10 | 11 | 12 |
Bežné kroky - Gridlayout v Jave
- Nastavenie kontajnera pomocou konštruktora JFrame:
Frame JFrame = new JFrame (); - Nastavenie manažéra rozloženia panela pomocou konštruktora JPanel:
Panel JPanel = nový JPanel (); - Pridávanie komponentov do kontajnera:
panel.add (tlačidlo); frame.add (panel); - Nastavenie orientácie súčasti:
panel.setComponentOrientation (ComponentOrientation.LEFT_TO_RIGHT);
Predvolená hodnota vlastnosti ComponentOrientation je, že orientácia komponentov je horizontálna a zľava doprava.
Typy konštruktorov s príkladom
Nižšie sú uvedené typy konštruktorov s príkladmi a kódmi.
1. GridLayout ()
Prázdny konštruktor s jedným stĺpcom na komponent v jednom riadku.
kód
import java.awt.*;
import javax.swing.*;
public class GridLayoutDemo (
public static void main(String() args) (
JFrame frame = new JFrame("Grid Layout");
frame.setVisible(true);
frame.setDefaultCloseOperation(JFrame.EXIT_ON_CLOSE);
frame.setSize(200, 200);
JPanel panel = new JPanel();
panel.setLayout(new GridLayout());JButton button1 = new JButton("1");
JButton button2 = new JButton("2");
JButton button3 = new JButton("3");
JButton button4 = new JButton("4");
panel.setComponentOrientation(ComponentOrientation.RIGHT_TO_LEFT);
panel.add(button1);
panel.add(button2);
panel.add(button3);
panel.add(button4);
frame.add(panel);
)
)
Výkon:

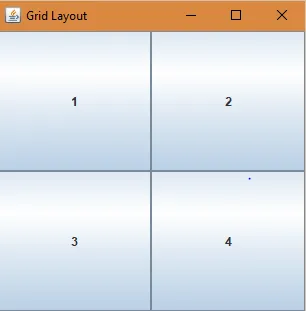
2. GridLayout (int riadky, int stĺpce)
Konštruktor so zadaným počtom riadkov a stĺpcov.
parametre:
riadky - počet riadkov (hodnota nula znamená akýkoľvek počet riadkov).
stĺpce - počet stĺpcov (hodnota nula znamená akýkoľvek počet stĺpcov).
kód
import java.awt.*;
import javax.swing.*;
public class GridLayoutDemo (
public static void main(String() args) (
JFrame frame = new JFrame("Grid Layout");
frame.setVisible(true);
frame.setDefaultCloseOperation(JFrame.EXIT_ON_CLOSE);
frame.setSize(200, 200);
JPanel panel = new JPanel();
panel.setLayout(new GridLayout(2, 2));
JButton button1 = new JButton("1");
JButton button2 = new JButton("2");
JButton button3 = new JButton("3");
JButton button4 = new JButton("4");
panel.setComponentOrientation(ComponentOrientation.LEFT_TO_RIGHT);
panel.add(button1);
panel.add(button2);
panel.add(button3);
panel.add(button4);
frame.add(panel);
)
)
Výkon:
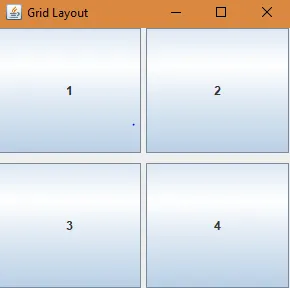
3. GridLayout (riadky int, stĺpce int, vodorovná medzera int, vertikálna medzera int).
Konštruktor so stanoveným počtom riadkov a stĺpcov, vodorovné a zvislé medzery medzi riadkami a stĺpcami.
parametre:
riadky - počet riadkov (hodnota nula znamená akýkoľvek počet riadkov).
stĺpce - počet stĺpcov (hodnota nula znamená akýkoľvek počet stĺpcov).
horizontálna medzera - medzi každým zo stĺpcov
zvislá medzera - medzi každým z radov
hody:
IllegalArgumentException - ak je hodnota riadkov aj stĺpcov nastavená na nulu.
kód
import java.awt.*;import javax.swing.*;
public class GridLayoutDemo (
public static void main(String() args) (
JFrame frame = new JFrame("Grid Layout");
frame.setVisible(true);
frame.setDefaultCloseOperation(JFrame.EXIT_ON_CLOSE);
frame.setSize(200, 200);
JPanel panel = new JPanel();
panel.setLayout(new GridLayout(2, 2, 5, 10));
JButton button1 = new JButton("1");
JButton button2 = new JButton("2");JButton button3 = new JButton("3");
JButton button4 = new JButton("4");
panel.setComponentOrientation(ComponentOrientation.LEFT_TO_RIGHT);
panel.add(button1);
panel.add(button2);
panel.add(button3);
panel.add(button4);
frame.add(panel);
)
)
Výkon:
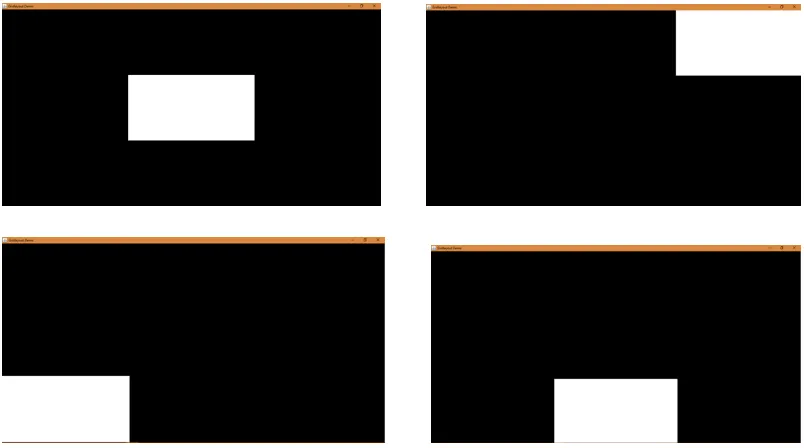
Príklad s implementáciou
Prípad: V prípade programu, ktorý je uvedený nižšie, sa vždy, keď dôjde k efektu myši nad bunkou mriežky, zmení jeho farba z čiernej na bielu.
kód
import java.awt.*;
import javax.swing.*;
import java.awt.event.MouseAdapter;
import java.awt.event.MouseEvent;
public class gridLayout extends JPanel(
public gridLayout() (
super(new GridLayout(3, 3));
JLabel label1, label2, label3, label4, label5, label6, label7, label8, label9;
//create the lables
label1 = new JLabel();
label2 = new JLabel();
label3 = new JLabel();
label4 = new JLabel();
label5 = new JLabel();
label6 = new JLabel();
label7 = new JLabel();
label8 = new JLabel();
label9 = new JLabel();
//set the background color for each label
label1.setBackground(Color.BLACK);
label1.setOpaque(true);
label2.setBackground(Color.BLACK);
label2.setOpaque(true);
label3.setBackground(Color.BLACK);
label3.setOpaque(true);
label4.setBackground(Color.BLACK);
label4.setOpaque(true);
label5.setBackground(Color.BLACK);
label5.setOpaque(true);
label6.setBackground(Color.BLACK);
label6.setOpaque(true);
label7.setBackground(Color.BLACK);
label7.setOpaque(true);
label8.setBackground(Color.BLACK);
label8.setOpaque(true);
label9.setBackground(Color.BLACK);
label9.setOpaque(true);
//add mouse listeners for each label
label1.addMouseListener(new MouseAdapter() (
public void mouseEntered(MouseEvent me) (
label1.setBackground(Color.WHITE);
)
public void mouseExited(MouseEvent me) (
label1.setBackground(Color.BLACK);
)
));
label2.addMouseListener(new MouseAdapter() (
public void mouseEntered(MouseEvent me) (
label2.setBackground(Color.WHITE);
)
public void mouseExited(MouseEvent me) (
label2.setBackground(Color.BLACK);
)
));
label3.addMouseListener(new MouseAdapter() (
public void mouseEntered(MouseEvent me) (
label3.setBackground(Color.WHITE);)
public void mouseExited(MouseEvent me) (
label3.setBackground(Color.BLACK);
)
));
label4.addMouseListener(new MouseAdapter() (
public void mouseEntered(MouseEvent me) (
label4.setBackground(Color.WHITE);
)
public void mouseExited(MouseEvent me) (
label4.setBackground(Color.BLACK);)
));
label5.addMouseListener(new MouseAdapter() (
public void mouseEntered(MouseEvent me) (
label5.setBackground(Color.WHITE);
)
public void mouseExited(MouseEvent me) (
label5.setBackground(Color.BLACK);
)));
label6.addMouseListener(new MouseAdapter() (
public void mouseEntered(MouseEvent me) (
label6.setBackground(Color.WHITE);
)
public void mouseExited(MouseEvent me) (
label6.setBackground(Color.BLACK);
)
));
label7.addMouseListener(new MouseAdapter() (
public void mouseEntered(MouseEvent me) (
label7.setBackground(Color.WHITE);
)
public void mouseExited(MouseEvent me) (
label7.setBackground(Color.BLACK);
)
));
label8.addMouseListener(new MouseAdapter() (
public void mouseEntered(MouseEvent me) (
label8.setBackground(Color.WHITE);
)
public void mouseExited(MouseEvent me) (
label8.setBackground(Color.BLACK);
)
));label9.addMouseListener(new MouseAdapter() (
public void mouseEntered(MouseEvent me) (
label9.setBackground(Color.WHITE);
)
public void mouseExited(MouseEvent me) (
label9.setBackground(Color.BLACK);
)
));
//add the labels
add(label1);
add(label2);
add(label3);
add(label4);
add(label5);
add(label6);
add(label7);
add(label8);
add(label9);
)
private static void createAndShowGUI() (
//create and setup the container
JFrame frame = new JFrame("Gridlayout Demo");
frame.setDefaultCloseOperation(JFrame.EXIT_ON_CLOSE);
frame.setSize(300, 300);
//add content to the container
frame.add(new gridLayout());
//display the container
frame.pack();
frame.setVisible(true);
)public static void main(String() args) (
createAndShowGUI();
)
)
Výkon:
záver
Gridlayout v Jave je užitočný, keď chcete vytvoriť mriežky v kontajneri spolu s jednou podmienkou, tj každá z buniek mriežky je rovnako veľká a rovnomerne rozmiestnená.
Ďalej sú uvedené aj ďalšie dostupné metódy:
1. getRows () - Získajte počet riadkov.
2. setRows (int i) - Nastavte počet riadkov na zadanú hodnotu.
3. getColumns () - Získajte počet stĺpcov.
4. setColumns (int i) - Nastavte počet stĺpcov na zadanú hodnotu.
5. getHgap () - Získa vodorovnú medzeru medzi komponentmi.
6. setHgap (int i) - Nastavte vodorovnú medzeru medzi komponentmi na zadanú hodnotu.
7.getVgap () - Získa zvislú medzeru medzi komponentmi.
8. setVgap (int i) - Nastavte vertikálnu medzeru medzi komponentmi na zadanú hodnotu.
9. addLayoutComponent (String name, Component comp) - pridá do rozloženia zadaný komponent so zadaným názvom.
10. removeLayoutComponent (Component comp) - odstráni zadaný komponent z rozloženia kontajnerov.
11. PreferovanýLayoutSize (rodič kontajnera) - Určuje preferovanú veľkosť kontajnera.
12. minimumLayoutSize (rodič kontajnera) - Určuje minimálnu veľkosť kontajnera.
13. layoutContainer (Container parent) - Rozdeľuje určený kontajner.
14. toString () - Vracia reťazcové znázornenie hodnôt rozloženia mriežky.
Odporúčané články
Toto je sprievodca programom Gridlayout v Jave. Tu sme diskutovali typy konštruktorov s príkladmi, kódy s implementáciou. Viac informácií nájdete aj v ďalších súvisiacich článkoch.
- Zlúčiť zoradenie v jazyku Java
- Rozloženie v Jave
- Najlepšie Java kompilátory
- Destruktor v Jave
- Rozloženie HTML