
Pokiaľ ide o výbery vo Photoshope, v skutočnosti existujú dva typy ľudí - tí, ktorí vedia, ako používať nástroj pero, a tí, ktorí zápasia. Väčšina ľudí odložila učenie, ako používať nástroj pero čo najdlhšie, zatiaľ čo iní sa k jeho učeniu nikdy nepristúpili, pretože veria, že je to príliš mätúce, príliš komplikovaný a jednoducho neprirodzený.
Ich práca vo Photoshope v konečnom dôsledku trpí, pretože sa spoliehajú na Lasso Tool pre takmer všetko, čo si nemôžu vybrať pomocou obdĺžnikových alebo eliptických nástrojov pre ohraničenie. V tomto výučbovom programe Adobe Photoshop ukončíme utrpenie. Dozvieme sa, aké ľahké je urobiť výber pomocou nástroja Pen.
Teraz, keď poviem „ľahký“, nemyslím tým, že si prečítate tento tutoriál a okamžite sa zmení na Pen Master. Naučiť sa používať nástroj Pen je veľa ako naučiť sa jazdiť na bicykli. Akonáhle sa naučíte, bude to vyzerať úplne prirodzene a budete sa čudovať, ako niekto nemohol vedieť, ako používať niečo také jednoduché. Ale dostať sa k tomuto bodu si vyžaduje trochu praxe a úsilia, a keď čítate každú knihu, ktorá sa venuje tomu, ako jazdiť na bicykli, vás môžu naučiť základy fungovania pedálov, prevodových stupňov a bŕzd, nie je to až vtedy, keď budete bojovať na bicykli. aby ste si udržali rovnováhu pri začatí skutočného učenia.
Jednou z vynikajúcich vecí v nástroji Pen Tool je to, že to nie je niečo, čo je výlučné pre Photoshop. Ďaleko od toho! Prakticky každý populárny program na úpravu fotografií, grafiku a rozloženie stránky používa nástroj pero v tej či onej podobe, takže akonáhle sa naučíte, ako ho používať vo Photoshope, budete už dobre rozumieť tomu, ako ho používať v mnohých ďalšie programy!
Kde nájdem nástroj pero?
Predtým, ako začneme hovoriť o tom, čo je nástroj pero alebo ako ho používať, mali by sme sa najskôr pozrieť, kde ho nájdete vo Photoshope. Nástroj pero nájdete v palete Nástroje, zoskupené s nástrojmi Tvar, Typový nástroj a Výber cesty (biela šípka) a Priamy výber (čierna šípka) Nástroje (pozri obrázok vľavo).
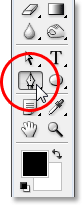
Nástroj pera Photoshopu
To samozrejme môže vzbudiť otázku, prečo, ak dokážeme vykonať výber pomocou nástroja Pero, nie je zoskupené s ostatnými nástrojmi výberu (nástroj obdĺžnikového orezania, nástroj eliptického orezania, nástroj laso atď.) Na stránke horná časť palety Nástroje? Prečo je to tam s ostatnými nástrojmi, ktoré zjavne nie sú nástrojmi výberu?
To je vynikajúca otázka a jednoducho sa stane, že bude rovnako vynikajúca odpoveď, ktorá sa s ňou spojí, ku ktorej sa za chvíľu dostaneme.
Prečo sa nazýva nástroj „pero“?
Jedným z prvých kameňov úrazu pri učení sa, ako používať nástroj pero, ako je to v prípade mnohých ďalších vecí vo Photoshope, je jeho meno, pretože koniec koncov, ak existuje jedna vec, ktorú každý, kto sa ju niekedy pokúsil použiť, vie, nejde o pen. Aspoň nie pero, na ktoré by ste normálne mysleli, keď začujete slovo „pero“. Skúste s ním napísať svoje meno rovnakým spôsobom, ako by ste mohli svoje meno podpísať na kúsok papiera perom a pravdepodobne skončíš skrúteným, zamotaným neporiadkom a vecami, ktoré sa opakujú všade okolo seba (samozrejme, myslím, že mohlo by sa veľmi dobre stať, ako podpíšete svoje meno).
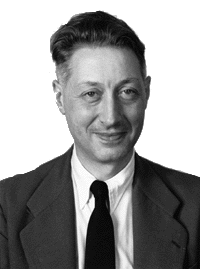 Pierre Bezier
Takže ak to nefunguje ako tradičné atramentové pero, prečo sa to nazýva Pen Tool? Nástroj Pen bol v priebehu rokov nazývaný niekoľkými vecami, a tým nemyslím na veci, ktoré ste možno nazvali v okamihoch frustrácie. Možno ste to počuli označovať ako Bezierovo pero alebo Bezierov nástroj, a to preto, že ho vytvoril muž menom Pierre Bezier (to je on vľavo), francúzsky inžinier a všadeprítomný chlapík, ktorý prišiel s efektná matematika, ktorá poháňa tento nástroj pri práci v automobilovej spoločnosti Renault (Pen Tool bol pôvodne vytvorený na pomoc pri navrhovaní automobilov).
Možno ste už počuli aj nástroj Pen, ktorý sa nazýva Paths Tool, a je to skutočne najvhodnejšie meno. Nástroj pero slúži predovšetkým na kreslenie „trás“. Ak chcete vykonať výber pomocou nástroja pero, jednoducho prevedieme cestu alebo trasy, ktoré sme nakreslili, na výber. Vždy to však začína cestou.
Doplnok Krátke kódy, akcie a filtre: Chyba v krátkom kóde (ads-basics-middle-2)
Čo je cesta?
„Cesta“ je, celkom úprimne, niečo, čo sa môže javiť trochu mimo miesta v programe, ako je Photoshop. Dôvod je ten, že Photoshop je primárne program založený na pixeloch . Trvá milióny malých štvorcových pixelov, ktoré tvoria typický digitálny obraz a robia s nimi veci. Cesty, na druhej strane, nemajú absolútne nič spoločné s pixelmi, a preto som povedal, že sa môžu zdať na mieste v programe, ktorý sa používa hlavne na úpravu a kreslenie pixelov.
Cesta nie je nič viac ako čiara, ktorá ide z jedného bodu do druhého, čiara, ktorá je úplne nezávislá od pixelov pod ňou a nezaujíma ju. Čiara môže byť rovná alebo môže byť zakrivená, ale vždy ide z jedného bodu do druhého, a ako som už spomenul, nemá s obrazovými prvkami v obraze vôbec nič spoločné. Cesta je úplne oddelená od samotného obrázka. V skutočnosti je cesta taká oddelená, že ak by ste sa pokúsili vytlačiť obrázok s cestou viditeľnou na obrazovke, cesta by sa na papieri neobjavila. Ak ste tiež uložili obrázok ako súbor JPEG.webp a nahrali ho na webovú stránku, aj keď ste ho uložili s cestou viditeľnou na obrazovke vo Photoshope, neuvidíte ho v obrázku na webe. Cesty sú určené iba pre vaše oči a Photoshop. Nikto iný ich nikdy neuvidí, pokiaľ náhodou nechodia okolo vášho počítača, kým pracujete.
Na vytvorenie cesty vždy potrebujeme minimálne dva body, pretože musíme vedieť, kde cesta začína a kde končí. Ak použijeme dostatok bodov, ktoré dokážu priviesť našu cestu späť na rovnaké miesto, odkiaľ to začalo, môžeme z ciest vytvoriť rôzne tvary, čo je presne to, ako fungujú rôzne tvary nástrojov Photoshopu. Nástroj Obdĺžnik využíva cesty spojené bodmi na kreslenie obdĺžnikového tvaru. Nástroj Ellipse Tool používa cesty, spojené bodmi, na kreslenie eliptického tvaru atď. Je to tiež spôsob fungovania Photoshopovho typového nástroja, aj keď úchytky vo Photoshope píšu trochu inak, ako v prípade bežných tvarov, ale všetky typy vo Photoshope sú v podstate vyrobené z ciest. V skutočnosti môžete previesť typ na tvary, čo vám potom poskytne všetky rovnaké možnosti úprav cesty s typom, ktorý získate pri práci s tvarmi.
Možno ste už počuli cesty, ktoré sa označujú ako obrysy, a to je celkom dobrý opis toho, čo je cesta, alebo aspoň to, čo môže byť. Môžeme nakresliť štvorcovú cestu, a ak s ňou neurobíme nič iné, pretože ju nevyplňujeme farbou ani na ňu nepoužívame ťah, potom máme iba základný obrys štvorca. Rovnaké je to s kruhom alebo iným tvarom, ktorý nakreslíme. Samotná cesta je iba obrysom tvaru. Až keď neurobíme niečo s cestou, napríklad ju nenaplníme, nevydáme mŕtvicu alebo ju neprevedieme na výber, cesta sa skutočne stane niečím viac než len základným obrysom.
Celú cestu môžete vybrať pomocou nástroja na výber cesty (známeho tiež ako nástroj „čierna šípka“), alebo môžete vybrať jednotlivé body alebo segmenty cesty pomocou nástroja na priamy výber (nástroj „biela šípka“). Cesta „segment“ alebo „čiarový segment“, ako sa niekedy nazýva, je akákoľvek cesta medzi dvoma bodmi. Napríklad obdĺžniková cesta by bola vytvorená zo štyroch bodov (jeden v každom rohu) a jednotlivé cesty spájajúce tieto body pozdĺž horného, dolného, ľavého a pravého okraja, aby vytvorili tvar obdĺžnika, sú segmenty cesty., Skutočná cesta samotná je kombináciou všetkých jednotlivých segmentov cesty, ktoré tvoria tvar.
To môže byť trochu mätúce, takže sa pozrime, čo tým myslím. Otvorte nový dokument vo Photoshope. Nezáleží na tom, aká je veľkosť. Zo zoznamu predvolieb vyberiem veľkosť 640 x 480, ale ako som už povedal, nezáleží na tom, akú veľkosť si vyberiete. Vyberte svoj nástroj pero z palety nástrojov. Nástroj pero môžete vybrať aj jednoducho stlačením písmena P na klávesnici.
Režimy s dvoma perami
Predtým, ako budeme pokračovať, musíme sa najprv uistiť, že pracujeme s cestami, a to preto, že nástroj pero v skutočnosti obsahuje dva rôzne režimy, v ktorých môže fungovať, a predvolene používa druhý režim. Ak je vybratý nástroj pero, ak sa pozrieme na panel Možnosti v hornej časti obrazovky, zobrazí sa skupina troch ikon:

Panel Možnosti vo Photoshope zobrazuje skupinu troch ikon predstavujúcich každý z troch režimov nástroja Pero.
Viem, že som povedal, že existujú dva režimy, v ktorých môže nástroj Pen Tool fungovať, a napriek tomu, ako keby to bolo mätúce, sú tu tri ikony, ale ikona napravo, čo je ikona výplne pixelov, je pri práci sivá a nie je k dispozícii. pomocou nástroja pero. Je k dispozícii iba pri práci s rôznymi nástrojmi Shape Tools, takže v skutočnosti potrebujeme iba dve ikony.
Ikona vľavo je ikona Vrstvy tvaru, známa tiež ako „nie tá, ktorú chceme“, a je predvolená. Keby sme pracovali s nástrojom pero s vybranou ikonou, nakreslili by sme tvary rovnako, ako keby sme používali rôzne nástroje Tvar, s výnimkou toho, že namiesto kreslenia preddefinovaného tvaru, ako je obdĺžnik alebo elipsa, mohli nakresliť akýkoľvek tvar, aký sme chceli. Ako som už povedal, to nie je to, čo chceme. Chceme ikonu vedľa nej, ikonu Cesty, takže ju vyberte a kliknutím na ňu ju vyberte:

Výukové programy vo Photoshope: Kliknutím na ikonu „Cesty“ na paneli Možnosti môžete pracovať s cestami pomocou nástroja Pero.
Keď je vybratý nástroj pero a ikona Paths na paneli Možnosti, kliknite kdekoľvek v dokumente. Neklikajte a pretiahnite, stačí kliknúť. Keď tak urobíte, pridáte malý štvorcový bod. Tu som ju rozšíril:

Kliknutím raz dovnútra dokumentu pomocou nástroja Pero pridajte bod.
Tento prvý bod, ktorý sme práve pridali, je východiskovým bodom našej cesty. Teraz momentálne nemáme cestu. Všetko, čo máme, je východiskový bod. „Bod“ sa technicky nazýva kotva alebo kotviaci bod a nazýva sa to tým, že zakotvuje cestu na miesto. Tento prvý bod zakotví začiatok cesty k tomuto bodu vo vnútri dokumentu. Keď pridávame ďalšie body, každý z nich ukotví cestu na miesto v tomto mieste.
Pridajme ďalší bod. Kliknite niekde inde v dokumente. Kdekoľvek bude robiť. Kliknem niekde napravo od môjho počiatočného bodu:

Výukové programy vo Photoshope: Pridajte druhý bod ukotvenia kliknutím niekde inde v dokumente.
Teraz som pridal druhý kotviaci bod a pozrite sa, čo sa stalo. Teraz mám priamku spájajúcu tieto dva body! Táto priamka je moja cesta. Ako som už spomenul, na vytvorenie cesty potrebujeme minimálne dva body, pretože potrebujeme vedieť, kde cesta začína a kde končí, a teraz, keď máme východiskový aj koncový bod, Photoshop dokázal prepojiť dva body dokopy, čo vytvára našu cestu.
Pridajme niekoľko ďalších bodov len pre zábavu. Kliknite niekoľkokrát na rôzne miesta vo vnútri dokumentu. Opäť neklikajte a pretiahnite, stačí kliknúť:
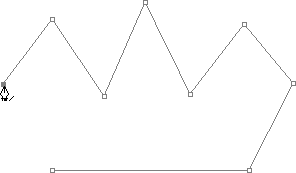
Pridajte ďalšie body kliknutím na rôzne miesta vo vnútri dokumentu.
Na obrázku vyššie som pridal sedem ďalších kotviacich bodov kliknutím na rôzne miesta pomocou nástroja Pero a zakaždým, keď som pridal jeden, dĺžka mojej cesty sa zväčšila, pretože medzi predchádzajúci bod a nový bod trasy sa pridal nový segment. nový bod. Moja cesta sa teraz skladá z deviatich kotvových bodov a ôsmich segmentov cesty. Mohol by som pokračovať v klikaní vo vnútri dokumentu, aby som pridal ďalšie body ukotvenia a segmenty cesty, ale to, čo by som teraz chcel urobiť, je zatvorenie mojej cesty, takže tvorí úplný tvar.
Záverečná cesta
Ak chcete cestu uzavrieť, stačí kliknúť ešte raz na náš počiatočný počiatočný bod. Keď umiestnite kurzor myši na počiatočný bod, v pravom dolnom rohu ikony pera sa objaví malý kruh:

Pri umiestnení kurzora nad počiatočný počiatočný bod cesty sa v pravom dolnom rohu ikony pera objaví malý krúžok.
Tento kruh nám hovorí, že sa chystáme prísť „s úplným kruhom“ s našou cestou a dokončiť ju tam, kde to začalo. Ak ju chcete zavrieť, kliknite priamo na počiatočný bod.
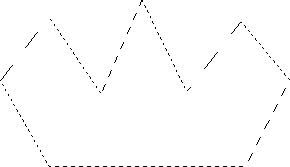
Nižšie vidíme, že moja cesta sa stala uzavretou cestou a teraz je základným obrysom tvaru:
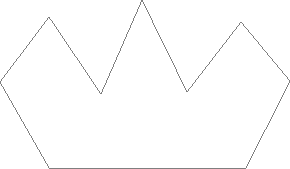
Cesta je teraz uzavretá a končí na začiatku a vytvára uzavretú cestu.
Aj keď táto cesta bola nakreslená len pre zábavu, ako príklad toho, ako nakresliť základnú cestu pomocou nástroja Pen Tool, môžem ju ľahko zmeniť na výber. Preto potrebujeme paletu Paths aplikácie Photoshop a my sa na to pozrieme ďalej.
Premena cesty na výber
Doteraz sme sa pozreli na to, čo je cesta a ako nakresliť základnú cestu pomocou nástroja Photoshop's Pen Tool. Ako ale postupujete pri výbere z cesty?
Jednoduché! Existuje niekoľko spôsobov, ako zmeniť cestu na výber, vrátane praktickej klávesovej skratky, ale predtým, ako sa pozrieme na rýchly spôsob, pozrime sa na oficiálny spôsob. „Oficiálny spôsob“ spočíva v použití palety Paths Photoshop, ktorú nájdete zoskupenú s paletou Vrstvy a Paletou Kanály:
Paleta Paths Paths vo Photoshope.
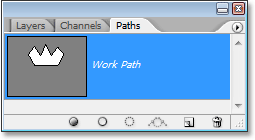
Na prvý pohľad vyzerá paleta Paths veľmi podobne ako paleta Vrstvy Photoshopu a spoločnosť Adobe ju takto zámerne vyrobila, takže sa pri jej používaní budete cítiť pohodlnejšie. Vidíme náhľad miniatúry tvaru cesty, ktorú sme práve vytvorili, a Photoshop predvolene nazýva cestu „pracovná cesta“, čo je v podstate fantastický spôsob, ako povedať „dočasný“, ako keby ste vytvorili iný cesta teraz bez premenovania tejto cesty na niečo iné, táto by bola nahradená novou cestou. Môžete mať iba jednu „pracovnú cestu“, takže ak si ju chcete ponechať, musíte pred vytvorením novej cesty dvakrát kliknúť na jej názov v palete Cesty a pomenovať niečo iné.
Pretože moja cesta vyzerá trochu ako koruna, dvakrát kliknem na názov „Pracovná cesta“, ktoré sa zobrazí po otvorení dialógového okna Uložiť cestu vo Photoshope, a svoju cestu „Koruna“ premenujem:

Dočasnú pracovnú cestu môžete uložiť jednoducho jej premenovaním.
Po dokončení kliknem na tlačidlo OK a teraz, keď sa znova pozriem na svoju paletu Cesty, môžem si byť istý, že moja „pracovná cesta“ bola premenovaná na „Koruna“:
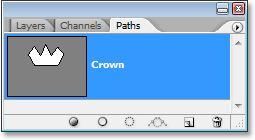
Paleta Cesty ukazuje, že cesta bola premenovaná na „Koruna“.
Premenovaním tejto cesty sa cesta uloží a nezmizne, ak sa chystám vytvoriť novú cestu. S uloženým dokumentom sa uložia aj všetky uložené cesty, takže ak teraz uložím dokument, uloží sa cesta spolu s ním a keď nabudúce otvorím dokument, cesta sa bude stále nachádzať v palete Cesty.
Uloženie cesty nie je niečo, čo musíte urobiť, aby ste z nej urobili výber. Vo väčšine prípadov, keď používate nástroj pero na výber, nebudete už po výbere potrebovať cestu, takže ju nebudete musieť ukladať. Ak ste to však chceli uložiť, jednoducho ho premenujte na niečo iné ako „Pracovná cesta“ a je to uložené.
Ak chcete zmeniť cestu na výber, keď sa pozrieme na spodnú časť palety Cesty, vidíme niekoľko ikon. Tieto ikony nám umožňujú robiť rôzne veci s našou cestou. Prvá ikona vľavo je ikona Vyplniť cestu farbou popredia, a ako naznačuje jej názov, kliknutím na ňu vyplníte našu cestu aktuálnou farbou popredia. Zaujímavé, ale to nie je to, čo chceme. Druhou ikonou zľava je dráha ťahu s ikonou kefy, ktorá aplikuje ťah na našu cestu pomocou toho, čo sme práve vybrali.
Je to skvelý spôsob, ako vo Photoshope vytvoriť zaujímavé efekty, ale pre to, čo tu robíme, premieňame cestu na výber, to nie je to, čo chceme. To, čo chceme, je tretia ikona zľava, ikona Načítať cestu ako ikona výberu:
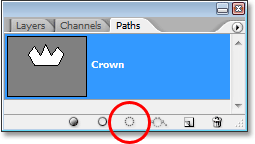
Ikona „Načítať cestu ako výber“ v dolnej časti palety Cesty.
Len čo kliknem na túto ikonu, moja cesta vo vnútri dokumentu sa stane výberom, akoby som ho vytvoril pomocou niektorého z najbežnejších nástrojov na výber vo Photoshope:
Cesta sa teraz zmenila na výber.
Je to také ľahké! V skutočnosti je to dokonca ešte jednoduchšie, pretože existuje klávesová skratka na premenu cesty na výber bez toho, aby ste museli vôbec prepínať na paletu Cesty. Keď ste nakreslili svoju cestu a ste pripravení ju zmeniť na výber, jednoducho stlačte klávesy Ctrl + Enter (Win) / Command + Return (Mac), aby aplikácia Photoshop cestu previedla na výber.
V súčasnosti môže byť pre vás trochu jasnejšie, prečo, aj keď je Nástroj pero veľmi nástrojom na výber, nie je zoskupený s ostatnými nástrojmi na výber v hornej časti palety Nástroje. Dôvodom je skutočnosť, že nástroj pero je primárne nástrojom cesty. Vytvára výbery tak, že najskôr vytvorí cesty, a preto má viac spoločného s rôznymi nástrojmi Tvar a Typ, z ktorých všetky používajú cesty, ako so základnými nástrojmi na výber, ako je napríklad nástroj obdĺžnikového orezania alebo laso. Nástroj, ktorý umožňuje výber iba na základe pixlov.
Pozrime sa na praktický príklad toho, čo sme sa doteraz naučili. Tu máme fotku stopky pred niektorými skalnatými útesmi:

Fotografie značky stop.
Povedzme, že som chcel vybrať túto stopku, aby som ju mohol skopírovať do vlastnej vrstvy. Značka stopky sa skladá iba zo série priamok, čo ju veľmi uľahčí. Najprv potrebujem východiskový bod pre svoju cestu, takže začnem v ľavom hornom rohu značky tak, že raz kliknem a vložím počiatočný kotviaci bod. V takom prípade nezáleží na tom, kde začnem cestu, ale začnem v ľavom hornom rohu:
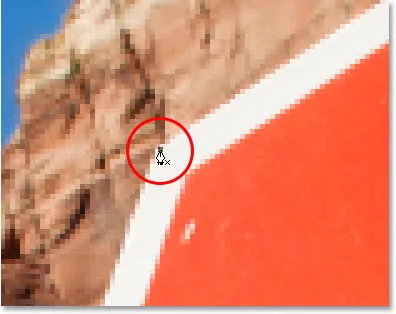
Jedným kliknutím v ľavom hornom rohu značky zastavenia začnete cestu s počiatočným kotviacim bodom.
Keď kliknem, všimnite si, ako som tu priblížený. Pri výbere pomocou nástroja Pero nájdete ľahšie priblíženie obrázka. Týmto spôsobom si môžete byť istí, že udržujete svoju cestu práve v oblasti, ktorú chcete vybrať.
Momentálne nemám cestu, mám iba východiskový bod pre svoju cestu. Ak chcete vytvoriť cestu, všetko, čo musím urobiť, je obísť značku a pridať kotviaci bod v každom rohu, kde musí cesta zmeniť smer. Keď pridávam každý kotviaci bod, objaví sa nový segment cesty spájajúci predchádzajúci kotviaci bod s novým, dokým sa neobjdem celú značku. Ak chcete cestu uzavrieť, jednoducho kliknem späť na počiatočný počiatočný bod. Je trochu ťažké vidieť na nasledujúcom obrázku, ale teraz mám cestu okolo celej značky zastavenia vrátane príspevku, ku ktorému je pripojený, jednoducho tak, že kliknem do rohov, kde cesta musí zmeniť smer:

Cesta sa teraz objaví všade okolo značky zastavenia na obrázku.
Ak sa teraz pozriem na svoju paletu Cesty, veľmi jasne vidím, že mám cestu v tvare značky stop:
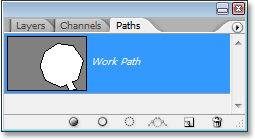
Paleta Paths vo Photoshope ukazuje cestu nakreslenú okolo značky zastavenia.
Všimnite si, ako aplikácia Photoshop naznala cestu „pracovná cesta“, čo znamená, že táto cesta je dočasná a stratím ju, ak vytvorím inú cestu bez toho, aby som ju najskôr najskôr premenoval. Aj keď nevytvorím novú cestu, stratím ju, keď zavriem dokument, pokiaľ ho najskôr neuložím. Túto cestu však nemusím zachraňovať, takže sa tým nebudem báť. Vo väčšine prípadov sa s tým nebudete musieť ani báť.
Ak chcete previesť moju cestu na výber, kliknem na ikonu Načítať cestu ako ikonu výberu v dolnej časti palety Vrstvy alebo by som rovnako jednoducho mohol stlačiť klávesy Ctrl + Enter (Win) / Command + Return (Mac):
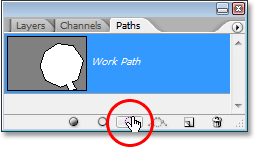
Kliknite na ikonu „Načítať cestu ako výber“ v palete Cesty alebo stlačte „Ctrl + Enter“ (Win) / „Command + Delete“ (Mac), čím zmeníte cestu na výber.
Hneď ako to urobím, moja cesta sa skonvertuje na výber a teraz sa vyberie značka zastavenia:

Značka zastavenia sa vyberie po premene cesty na výber.
Prejdem späť na svoju paletu Vrstvy a skopírujem stopku do svojej vlastnej vrstvy, použijem klávesovú skratku Ctrl + J (Win) / Command + J (Mac), ktorá umiestni značku na svoju vlastnú vrstva nad vrstvou pozadia:
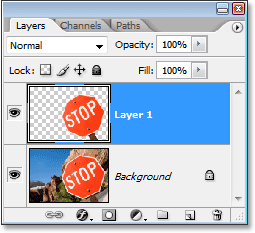
Značka zastavenia bola teraz skopírovaná do svojej samostatnej vrstvy.
Keď je značka teraz na svojej vlastnej vrstve, môžem s ňou robiť, čo sa mi páči, vymieňať si pozadie za iný obrázok, alebo robiť pozadie čiernobielo, zatiaľ čo farbu sa opúšťa vo farbe, bez ohľadu na to, na čo si myslím. Ide o to, že som bol schopný ľahko vybrať znamienko kliknutím v rohoch pomocou nástroja Pen Tool, ktorý vytvoril cestu okolo značky, a potom som cestu jednoducho premenil na výber.
Doteraz sme sa pri výbere pomocou nástroja Pero vo Photoshope dozvedeli, že pero je v každom prípade nástrojom na výber ako najbežnejšími nástrojmi na výber Photoshopu, ako sú napríklad obdĺžnikové orámovanie a laso nástroje, ale namiesto toho, aby sme robili výbery ako v prípade iných nástrojov, nástroj Pen Tool nakreslí cesty, ktoré potom možno ľahko previesť do výberov, buď z palety Cesty alebo pomocou rýchlej klávesovej skratky.
Preto sa pero nenachádza v hornej časti palety nástrojov spolu s ostatnými nástrojmi na výber pixlov, ale namiesto toho je zoskupené s nástrojmi cesty, ako sú rôzne nástroje Tvar, typový nástroj a nástroje na výber cesty a priamy výber., Nástroj Pen je o cestách, nie o pixeloch.
Dozvedeli sme sa, že do nášho dokumentu môžeme pridať kotviace body, ktoré ukotvujú cestu na svojom mieste jednoduchým kliknutím na rôzne miesta pomocou nástroja Pero a keď pridávame ďalšie a ďalšie kotviace body, vytvoríme cestu ako každý nový bod. je spojený s predchádzajúcim bodom novým segmentom cesty. Dozvedeli sme sa tiež, že cesta je zvyčajne označovaná ako „netlačový prvok“, čo znamená, že bez ohľadu na to, koľko ciest pridáme, žiadna z nich nebude viditeľná na papieri, keď ideme tlačiť obrázok., Nebudú tiež viditeľné, ak zobrazíme obrázok na webovej stránke. Cesty sú viditeľné iba pre nás pri práci vo Photoshope (cesty však podporujú aj iné programy ako Adobe Illustrator). Až keď neurobíme niečo s cestou, ako ju napĺňame farbou, aplikujeme na ňu ťah alebo ju neprevedieme na výber, cesta sa stane niečím viac než len základným, netlačiacim obrysom tvaru.
Videli sme, aké ľahké by bolo použiť nástroj pero na výber niečoho ako stopku tým, že ho načrtneme cestou vytvorenou zo série priamych segmentov cesty a potom ju zmeníme na výber. To je skvelé, ale v skutočnosti sme zatiaľ neurobili nič, čo by sme nemohli urobiť ľahšie s niečím, ako je napríklad nástroj Lasso, alebo ešte lepšie, nástroj Polygonal Lasso Tool, ktorý bol navrhnutý špeciálne na výber plochých tvarov, ako je napríklad náš doraz. podpísať. Je pravdepodobné, že pokiaľ nemáte nejakú zvláštnu fascináciu dopravnými značkami, skôr alebo neskôr budete chcieť vybrať niečo trochu zaujímavejšie a výrazom „zaujímavé“ mám na mysli náročnejšie. A „výzvou“ mám na mysli niečo, čo obsahuje krivky. Výber zakriveného objektu vo Photoshope je zvyčajne vtedy, keď zistíte, že strácate všetku úctu k základným nástrojom výberu. Našťastie sa stáva, že nastane čas, keď nástroj Pen Tool skutočne svieti!
Skôr ako budeme pokračovať, mal by som zdôrazniť, že všetko, čo sme doteraz urobili, bolo celkom jednoduché. Kliknite sem, kliknite sem, skonvertujte cestu na výber. Táto ďalšia časť, v ktorej sa dostaneme do kreslenia kriviek, nie je taká jednoduchá, aj keď to určite nie je ťažké, ale ak je to prvýkrát, s nástrojom Pen alebo ak s tým nemáte veľa skúseností, práca s krivkami sa môže zdať trochu neprirodzené a dokonca trochu ohromujúce. To je určite tam, kde prichádza analógia „jazdenia na bicykli“. Najprv môžete niekoľkokrát spadnúť a čudovať sa, ako to niekto dokáže, ale čím viac cvičíte a čím viac sa budete držať, tým viac to bude mať zmysel začína robiť. V žiadnom momente sa vám nebude zdať druhá príroda a zrazu pochopíte, prečo toľko ľudí prisahá, že nástroj Pen je jediným najväčším výberovým nástrojom vo všetkých aplikáciách Photoshop! Vážne to naozaj je.
Získanie rukoväte na smerové rukoväte
Začnime znova s nástrojom Pen. Otvorte nový prázdny dokument Photoshopu alebo jednoducho vymažte to, čo ste doteraz urobili v existujúcom dokumente, takže začíname nový. Potom, keď je na paneli možností vybratý nástroj pero a vybratá možnosť Cesty (nezabudnite, že je predvolená možnosť Vrstvy tvaru, takže sa musíte uistiť, že máte vybratú možnosť Cesty), kliknite raz kdekoľvek v dokumente, rovnako ako predtým sme to urobili. Tentokrát namiesto toho, aby ste kliknutím pridali kotviaci bod, kliknite a potom potiahnite myš kúsok od kotviaceho bodu pred uvoľnením tlačidla myši:
Pomocou nástroja Pero kliknite kdekoľvek v dokumente a potom potiahnite krátku vzdialenosť od kotviaceho bodu.
Po dokončení sa zobrazí kotviaci bod s dvoma čiarami, ktoré z neho vyčnievajú. Na prvý pohľad si môžete myslieť, že sa nám nejako podarilo vytiahnuť cestu pomocou nástroja Pen. Koniec koncov, vyzerá to, že máme tri kotviace body, jeden na oboch koncoch a jeden v strede, pričom ich spájajú dva segmenty cesty. Ak sa však pozrieme trochu bližšie, vidíme, že body na oboch koncoch sú o niečo menšie ako v strede a že v skutočnosti majú iný tvar. Jeden v strede je štvorcový, a ako sme videli, bod ukotvenia je štvorcový, ale tie na oboch koncoch sa javia ako kosoštvorcové. Sú niektoré body ukotvenia štvorcové a iné kosoštvorcové?
Nie. Všetky kotviace body sú štvorcové a všetky majú rovnakú veľkosť, čo znamená, že menšie, kosoštvorcové body na koncoch nie sú kotviacimi bodmi. A ak nejde o kotviace body, znamená to, že čiary nie sú úseky cesty, pretože na vytvorenie cesty potrebujeme najmenej dva kotviace body a práve teraz je jediný kotviaci bod ten, ktorý je v strede. Čo presne sú tie čiary, ktoré sa tiahnu od kotviaceho bodu? Sú to rukoväte smeru!
„Aha, smerové rukoväte!“ ty hovoríš. "Teraz to chápem!"
… … …………….
„Počkaj, nie, nie. Čo to sakra sú rukoväte smeru?“
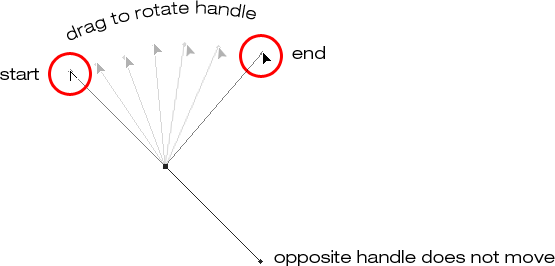
Smerové úchytky sú, dobre, úchytky a používajú sa iba pri vytváraní zakrivených úsekov cesty. Pri vytváraní priamych úsekov cesty nie sú potrebné smerové páčky. Zvyčajne sú dve, hoci niekedy je len jedna a ako sme už videli, vyčnievajú z kotviacich bodov. Nazývajú sa „úchytky“, pretože ako uvidíme o chvíľu, môžete ich skutočne uchopiť a presunúť ich.
Smerové kľučky ovládajú dve veci. Ovládajú uhol krivky, regulujú dĺžku krivky a robia to skutočne elegantne. Dôvodom je, že obvykle dvaja z nich sú preto, že jeden z nich riadi uhol a dĺžku krivky prichádzajúcej do kotviaceho bodu, a druhý riadi uhol a dĺžku krivky vytekajúcej z kotviaceho bodu.
Predtým, ako sa pozrieme na to, ako nakresliť krivky pomocou smerových úchytiek, najprv sa pozrime, ako ovládať samotné úchytky, pretože náš úspech v kreslení kriviek bude veľa závisieť od našej schopnosti ovládať úchytky. Neboj sa, ako sa hovorí, to nie je raketová veda. Musíte sa naučiť niekoľko jednoduchých vecí. Už sme videli, ako vytvoriť smerové úchytky, kliknutím na nástroj pero a potom potiahnutím od kotviaceho bodu. Čím ďalej od kotviaceho bodu ťaháme, tým dlhšie budú smerové rukoväte. Čím dlhšia je rukoväť, tým dlhšia je krivka. Krátka rukoväť, krátka krivka. Dlhá rukoväť, dlhá krivka.
Jednou z pekných vecí, ktoré sa o nástroji Pen Tool dozviete pomerne rýchlo, je to, že je mimoriadne odpustiteľné. Keď kreslíte cesty s tým, nie je vôbec potrebné sa obávať, že sa veci dostanú do poriadku, pretože keď skončíme, môžeme sa vrátiť a opraviť veci ľahko! Umiestnili ste kotviaci bod na nesprávne miesto? Žiaden problém! Jednoducho ho presuňte tam, kde to potrebujete! Uvidíme, ako to urobiť za chvíľu. Vytiahli ste smerovú páku nesprávnym smerom? Žiadny problém. Uchopte rukoväť a otočte ju v požadovanom smere. Znovu uvidíme, ako to urobiť. Je jeden z vašich smerových úchytiek príliš dlhý alebo príliš krátky? Žiadny problém. Stačí naň kliknúť a podľa potreby ho pretiahnuť dlhšie alebo kratšie (áno, uvidíme, ako to urobiť). Cesty sú vždy plne editovateľné, takže nie je absolútne dôvod sa obávať, že by ste urobili chybu alebo aby ste ju dostali hneď po prvýkrát. Nezdá sa ti to už trochu lepšie?
Smerové a otočné rukoväte
Ako som už spomenul, nazývajú sa smerové rukoväte, pretože ich môžete chytiť ako rukoväte a posúvať ich. Pozrime sa, ako to urobiť. Najprv sa pozrieme na to, ako otočiť obe kľučky súčasne. Pomocou kotviaceho bodu a dvoch smerových úchytiek, ktoré sme už vytvorili, podržte stlačený kláves Ctrl (Win) / Command (Mac). Ikona nástroja pero sa dočasne zmení na ikonu nástroja priameho výberu (biela šípka), a to preto, že keď je vybratý nástroj pero, podržaním klávesu „Ctrl / Command“ sa stane rýchlou skratkou pre dočasný prístup k nástroju priameho výberu, ktorý je čo používame na výber rôznych častí našej cesty. Potom jednoducho kliknite priamo na malý kosoštvorcový tvar na konci ktorejkoľvek zo smerových úchytiek (samotné kliknutie na „čiaru“ nebude fungovať, takže vždy musíte kliknúť na kosoštvorcový tvar na konci rukoväte, aby ste urobili čokoľvek) s ním) a pretiahnite ho okolo kotviaceho bodu, aby ste ho otočili. Keď otáčate jednou z rukovätí, druhá rukoväť sa otáča spolu s ňou v opačnom smere, akoby vyzerala ako píla. Môžete si tiež všimnúť, že akonáhle začnete ťahať rukoväťou, ikona kurzora myši sa znova zmení, tentoraz na ikonu nástroja presunu, pretože niečo presúvame z jedného miesta na druhé:
Podržte stlačený kláves „Ctrl“ (Win) / „Príkaz“ (Mac) a kliknite na koniec ktoréhokoľvek z smerových úchytiek, potom potiahnite rukoväť a otočte ju okolo kotviaceho bodu. Keď ťaháte jednu rukoväť, druhá sa otáča opačným smerom.
Keď začnete ťahať kľučkou, môžete uvoľniť kláves „Ctrl / Command“. Nie je potrebné, aby to po celú dobu.
Ak chcete zmeniť veľkosť rukoväte smeru, keď ju otáčate, jednoducho potiahnite koniec rukoväte smerom k kotviacemu bodu, aby ste ho skrátili, alebo ho potiahnite preč od kotviaceho bodu, aby ste ho predĺžili. Ako som už uviedol vyššie, kratšia rukoväť krivku skráti a dlhšia rukoväť krivku zväčší. Nemôžete však zmeniť veľkosť oboch úchytiek súčasne, takže ak potrebujete zmeniť veľkosť oboch úchopov, budete musieť každú z nich pretiahnuť dlhšie alebo kratšie samostatne. Jediné, čo môžete urobiť obom súčasne, je ich striedanie. Ak ste už tlačidlo myši uvoľnili po otočení úchytiek a kurzor sa zmenil späť na ikonu nástroja pero a musíte zmeniť veľkosť jednej z úchytiek, budete musieť dočasne dočasne podržať stlačený kláves Ctrl / Command prepnite späť na nástroj pre priamy výber a potom kliknutím a potiahnutím konca držadla zmeníte jeho veľkosť:
Konce držadiel potiahnite smerom ku kotviacemu bodu, aby ste ich skrátili, alebo ich potiahnite od kotviaceho bodu, aby sa predĺžili.
Teraz sa pozrime, ako otočiť rukoväte nezávisle od seba. To rotate one handle without affecting the other one, first release your mouse button if you've been rotating or resizing the handles so your cursor changes back into the Pen Tool icon. Then, instead of holding down "Ctrl/Command", which moves both handles at once, hold down your Alt (Win) / Option (Mac) key and click on the end of either of the direction handles. You'll see your cursor change into the Convert Point Tool icon, which looks like a simplified arrow made of only two lines, almost like an upside down letter "v" (except that it's not quite upside down). Then, simply drag the handle around the anchor point to rotate it, just as you did before, and this time, the handle will rotate independently of the other one, breaking the connection between them:
Hold down "Alt" (Win) / "Option" (Mac) and click on the end of either of the direction handles, then drag the handle to rotate it around the anchor point independently of the other handle.
Again, you can release your "Alt/Option" key after you've started dragging. You don't have to hold it down the whole time.
You can also resize direction handles using the "Alt/Option" key in exactly the same way as you can with the "Ctrl/Command" key. If you're in the process of rotating a handle, simply drag it in towards the anchor point to make it shorter or away from the anchor point to make it longer. If you've already released your mouse button and your cursor is showing the Pen Tool icon again, you'll need to hold down "Alt/Option" once again, then click on the end of the handle and drag it to resize it.
Is there a difference between resizing the handles using "Ctrl/Command" and using "Alt/Option" to do it? Yes there is. If you haven't yet "broken the connection" between the handles by dragging one independently of the other, resizing a handle using "Ctrl/Command" will keep the handles connected together. It won't resize both handles at once, but it won't break the connection between them either so you'll still be able to rotate them together if you need to. If you resize a handle using "Alt/Option", you'll break the connection between the handles. Even if you don't rotate the handle as you're resizing it, the connection will still be broken.
What if you've broken the connection between the handles by rotating them using "Alt/Option" and then want to rotate them together again? Can you "rebuild the connection", so-to-speak, by selecting one of them while holding down "Ctrl/Command" as before? Good question, and the answer is no. Once you've broken the connection between the handles, the "Ctrl/Command" key on its own won't bring it back. You'll need to select one of the handles while holding Ctrl+Alt (Win) / Command+Option (Mac) at that point in order to move the handles together again.
Quick Summary So Far …
We've covered a lot of information here about working with direction handles, so before we move on and start drawing some actual curves, let's do a quick recap:
- To add an anchor point, simply click with the Pen Tool.
- To add an anchor point with direction handles extending out from it, click with the Pen Tool, then drag away from the anchor point before releasing your mouse button. The further you drag, the longer the direction handles will be.
- To rotate the direction handles together, hold down Ctrl (Win) / Command (Mac), which will temporarily switch you to the Direct Selection Tool, then click on the end of either handle and drag it around the anchor point. The other handle will rotate in the opposite direction.
- To rotate the direction handles independently, hold down Alt (Win) / Option (Mac), which will temporarily switch you to the Convert Point Tool, then click on the end of either handle and drag it around the anchor point. The other handle will not rotate.
- To resize handles without breaking the connection between them, hold down Ctrl (Win) / Command (Mac) to switch to the Direct Selection Tool, then click on the end of either handle. Drag it towards the anchor point to make it shorter, or drag it away from the anchor point to make it longer.
- To resize handles and break the connection between them, hold down Alt (Win) / Option (Mac) to switch to the Convert Point Tool, then click on the end of either handle. Drag it towards the anchor point to make it shorter, or drag it away from the anchor point to make it longer.
- To rotate the direction handles together after breaking the connection, hold down Ctrl+Alt (Win) / Command+Option (Mac), then click on the end of either handle and drag it around the anchor point. The other handle will once again rotate with it.
Okay, that pretty much covers the basics of how to control the direction handles. Let's see how we can use them to draw some curves!
We've covered a lot of ground so far. We know about anchor points and direction handles. We know that in order to draw straight path segments, all we need to do is lay down a series of anchor points wherever we need them simply by clicking with the Pen Tool, and as we add more and more anchor points, we add more straight sections to our path. We know how to create direction handles and how to rotate them, either together or separately, and how to resize them.
We know how to turn a path into a selection by clicking on the "Load path as selection" icon at the bottom of the Paths palette or by simply pressing "Ctrl+Enter" (Win) / "Command+Return" (Mac) on the keyboard. One thing I didn't mention yet is that regardless of whether our path consists of straight lines,
curves, or a combination of straight lines and curves, converting it into a selection is done exactly the same way, and we've already learned how to do it, which means we're well on our way to mastering making selections with the pen! All we need to do is get a bit of practice drawing curves, which is exactly what we're about to do!
Stále sa posúvate? Stiahnite si tento návod ako PDF!
Drawing A Curve
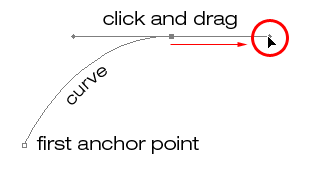
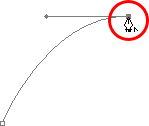
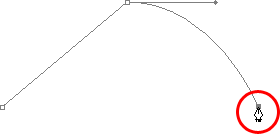
Let's once again start fresh, either by opening up a new blank document in Photoshop or by deleting what you've already done. We're going to draw our first curve so we can put all of our newly-aquired direction handle knowledge to use. First, with the Pen Tool selected and the Paths option selected in the Options Bar, click once somewhere in your document to add an anchor point. Just click, don't click and drag. You should have one single anchor point on the screen when you're done.
Then, move your mouse cursor up and to the right of your initial anchor point. Click again to add a second anchor point, but this time, drag your mouse a little to the right of the anchor point to drag out direction handles. Hold down Shift as you drag to constrain your movement to a horizontal direction. As you drag out the direction handles, you'll see your path appearing as a curve between the two anchor points! The further you drag your mouse, the longer you make the direction handles, and the more of a curve you create:
Click once to add an anchor point, then click and drag out a second anchor point with direction handles, creating a curved path segment between the two points.
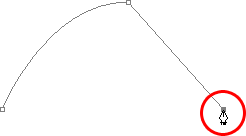
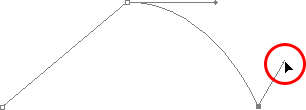
Click down and to the right of the second anchor point to add a third anchor point. This time, don't click and drag, just click:
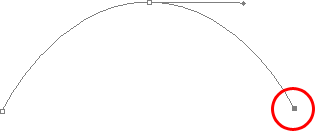
Add a third anchor point down and to the right of the second one by clicking with the Pen Tool.
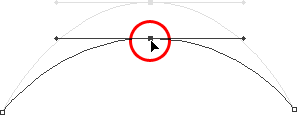
As soon as you add the third anchor point, a second path segment will appear, joining the second anchor point with the third one. And because our second anchor point has direction handles extending from it, this new path segment is also curved! We now have a nice, smooth arc starting from the first point on the left, then passing through the anchor point with the direction handles up top, and coming to an end at the third point.
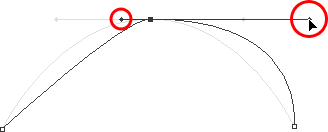
One thing you may have noticed, and you can see it in the screenshot above, is that when you added the third anchor point, the direction handle extending out the left side of the second anchor point disappeared. It's still there, Photoshop simply hid it from view. To see it again, use the keyboard shortcut we've already learned to temporarily switch to the Direct Selection Tool, which is by holding down the Ctrl (Win) / Command (Mac) key, and then click on the second anchor point to select it. As soon as you do, the missing direction handle reappears as if it was there the whole time (which it was):

Hold down the "Ctrl" (Win) / "Command" (Mac) key to temporarily switch to the Direct Selection Tool, then click on the top anchor point to select it. The missing anchor point reappears.
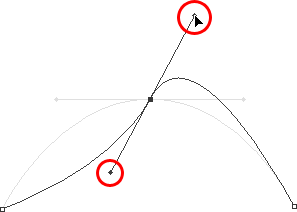
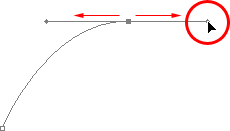
With your "Ctrl/Command" key still held down so you still have access to the Direct Selection Tool, try resizing each direction handle by clicking on the end of each one to select it and then dragging it towards and away from its anchor point. Again, hold "Shift" as you drag to constrain your movement horizontally, and watch what happens. As you increase the length of a handle, you get more of a curve, and as you decrease its length, you get less of a curve. Also notice that each handle controls its own side of the curve. The handle on the left controls the curve coming into the anchor point from the left, and the handle on the right controls the curve flowing out from the anchor point on the right.
Here, I've made my handle on the left shorter, and as we can see, there's much less of a curve now than there was originally, almost becoming a straight line. I've also made the handle on the right longer, and as a result, the curve on the right is now much more pronounced. The faint curve is the original for comparison:
Change the shape of the curves by resizing the direction handles. The left handle controls the left curve, and the right handle controls the right curve.
I'm going to undo my changes by pressing Ctrl+Alt+Z (Win) / Command+Option+Z (Mac) a couple of times to set my direction handles back to their original sizes so they're equal length once again. Now let's try rotating the handles. Hold down "Ctrl/Command" once again to access the Direct Selection Tool, then click on the end of either handle to select it and try rotating it around the anchor point. Since we selected the handle with "Ctrl/Command", both handles rotate together. Here I've dragged my left handle down and to the right, and the angle of the curve on the left changed along with it, now appearing as more of a slope as it rises up towards the anchor point. By dragging the left handle down and to the right, I caused the right handle to rotate up and to the left, and again, the angle of the curve on the right changed along with it, now rising above the anchor point briefly before making a steep decent down to the anchor point on the right. Again, the faint curve is the original for comparison:
Rotate the direction handles to change the angle of the curves. Select a handle while holding "Ctrl" (Win) / "Command" (Mac) to rotate both handles together.
The Dreaded "Loop"
One thing you want to avoid is rotating the handles too far, which will cause your path segments to overlap and create loops. Here, I've rotated my handles all the way around so that the left handle is now on the right and the right handle is on the left, and notice what's happened. My path segments are now overlapping each other, creating a loop:
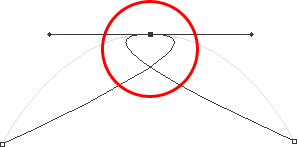
Rotating the direction handles too far causes the path segments to overlap, creating an unwanted loop in the path.
Loops can be caused by rotating the direction handles too far, as I've done above, but more often than not, they're caused by a handle being too long, making the curve too long and causing it to overlap with itself. If that happens, which it does sometimes as you're drawing a path, simply shorten the length of the direction handle. Most people end up creating a whole bunch of loops in their path when they first start working with the Pen Tool, so don't think you're the only one. No need to panic or become frustrated though. As I said, the problem is most likely being caused by a direction handle being too long, and all you need to do is shorten the handle to "un loop" the loop!
I'm going to press Ctrl+Alt+Z (Win) / Command+Option+Z (Mac) a few times once again to undo my changes and reset my path back to the nice smooth arc I started with. Now, what about rotating the direction handles independently of each other? As we learned on the previous page, to rotate the handles separately, instead of selecting them with "Ctrl/Command", we simply select them while holding down Alt (Win) / Option (Mac), which gives us temporary access to the Convert Point Tool. Click on the end of a handle to select it, then drag it with your mouse to rotate it and this time, the other handle will stay in place, breaking the connection between them.
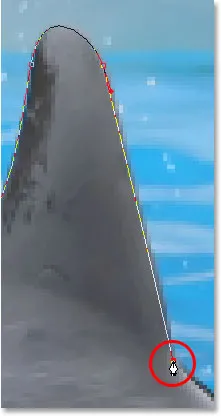
Here, I've selected the handle on the right while holding "Alt/Option" and then rotated it down and to the left. Notice how once again, the angle of the path segment on the right changes to match the new direction of the handle, and this time, the handle on the left, along with the path segment on the left, both stay in place. My path now looks a bit like a shark fin:
Hold down "Alt" (Win) / "Option" (Mac) to temporarily access the "Convert Point Tool", then click on the end of a direction handle to select it and rotate it independently of the other handle.
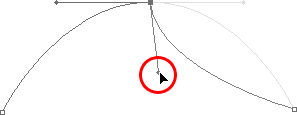
Moving An Anchor Point
One thing we haven't looked at yet is how to move an anchor point. If you recall, I mentioned on the previous page that the Pen Tool is extremely forgiving, and one of the reasons for it, besides being able to rotate and resize our direction handles after we've created them, is that we can easily move anchor points from one spot to another if we need to. As we've already learned, anchor points anchor a path into place. The anchor points themselves, however, are not anchored into place. You can move an anchor point anywhere, anytime, and any path segments that are connected to it will move and adjust right along with it.
To move an anchor point, hold down Ctrl (Win) / Command (Mac) to temporarily access the Direct Selection Tool as we've already been doing, then simply click on the anchor point to select it and drag it to its new location with your mouse. Any path segments connected to it will move with it to the new location. Here, I've dragged my middle anchor point down a bit from its original location (again, the faint path marks the original location for comparison). Notice how the path itself has changed shape to adjust to the new location of the anchor point:
Hold down "Ctrl" (Win) / "Command" (Mac) and click on an anchor point to select it, then drag it to a new location. Any path segments connected to the point will move with it, changing shape as needed.
Normally, when outlining an object with a path to select it using the Pen Tool, you won't need to move to an anchor point quite as far as what I've done above, but it's very common to go back around your path after you've created it and nudge a few anchor points here and there to fine-tune the path. Once you've selected an anchor point, you can nudge it up, down, left or right using the arrow keys on your keyboard.
Combining Straight Paths With Curves
What if I didn't want both of my path segments to be curves? What if what I needed was for the first path segment to be curved, but the second one needed to be straight? Let's see how to do that. I'm going to delete my existing path and start over again. First, I'll click to add an anchor point to start things off. Then, just as before, I'll click to add a second anchor point up and to the right of my initial point, and this time, I'll drag out direction handles, which will create a curved path connecting the two points, giving me exactly what I had way up at the start of this page:
Click once to add an anchor point, then click to add a second anchor point and drag out direction handles to create a curve.
I now have my initial curve, but I want my next path segment to be straight. If I was to simply click somewhere to add another anchor point right now, I would get another curve because I have that direction handle extending out from the right side of the last anchor point I added. What I need to do is get rid of that one direction handle. Without a direction handle controlling the angle and length of a curve, we get a straight line.
To remove the handle, leaving only the handle on the left of the anchor point, all I need to do is hold down Alt (Win) / Option (Mac), which will again temporarily switch me to the Convert Point Tool, and then I just click directly on the anchor point. When I do, the direction handle on the right disappears, leaving only the one on the left:
Hold down "Alt" (Win) / "Option" (Mac) and click directly on the anchor point to remove the direction handle on the right, leaving only the one on the left.
Now, with the direction handle gone, if I click to add a new anchor point, I get a straight path segment between the two points :
With the direction handle on the right now gone, clicking to add a new anchor point adds a straight path segment between the two points.
I now have a curved path segment on the left and a straight one on the right! What if I wanted the exact opposite? Suppose I needed to start with a straight path segment and then follow it with a curve? To do that, first I'll start by clicking to add an initial anchor point. Then, since I want a straight path segment, all I need to do is click somewhere else to add a second anchor point, and I automatically get a straight path connecting the two points:
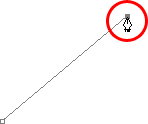
Click with the Pen Tool to add an initial anchor point, then click again somewhere else to add a second anchor point and create a straight path segment between them.
I'm going to keep my mouse button held down after clicking to add my second anchor point because I want my next path segment to be curved, and we know that in order to create a curve, we need a direction handle. To add a handle extending out from the right of my anchor point, I'm going to hold down Alt (Win) / Option (Mac), and with my mouse button still down, I'm simply going to to drag to the right of the anchor point. As I do, a direction handle will drag out along with it:
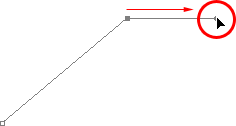
Hold down "Alt" (Win) / "Option" (Mac) and drag out a direction handle on the right of the anchor point.
Notice that the direction handle extended only from the right of the anchor point, not from both sides, leaving my straight path segment on the left in place. And now that I have my direction handle on the right, all I need to do to create my curve is click to add a third point:
Click to add a third anchor point, which creates a curved path segment between the previous anchor point and the new one.
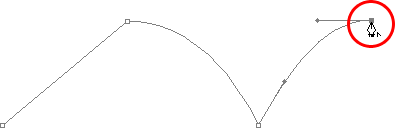
And there we go! I now have a straight path segment on the left, followed by a curved segment on the right. Of course, most paths you draw are going to consist of more than just three anchor points. Let's say I wanted to continue this path, moving in the same general direction towards the right, and I want my next path segment to be curved as well. Just as I did a moment ago, I would leave my mouse button held down after clicking to add my third point. I would hold down Alt (Win) / Option (Mac) and I would drag out another direction handle. So far, we've only been dragging handles out towards the right, but what you really want to do is drag your handles out in the general direction you want the curve to follow. I want to create a curve that goes up and to the right, so I'm going to drag out a small handle in that same general direction:
Drag out your direction handles in the general direction of the curve.
Tip! A good practice to get into is to keep your direction handles small when first dragging them out, since you never really know how long or at what exact angle they need to be until the actual curve appears, and the curve doesn't appear until you've added both of its anchor points. Once you've added both points and the curve appears, you can easily go back and make any adjustments you need to the handles. You may even want to wait until you've drawn the entire path before worrying about adjusting the handles.
With my direction handle created, I'm going to click to add a fourth anchor point, and I'm going to drag out direction handles from it as well:
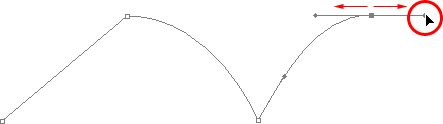
Adding a fourth anchor point along with direction handles extending from it.
I now have a third segment added to my path, this one being a curve. Notice that this curve actually has two direction handles controlling it, one extending from the right of my third anchor point and one extending from the left of my fourth point:

The third path segment now has two direction handles, one on either end, working together to control the curve.
The overall shape of this curve is now being controlled by the length and direction of both of these handles. Watch what happens to the curve when I move the handles. I'll drag the bottom handle down and to the right, and I'll drag the top handle up and to the left. I'll also drag both of these handles longer. The faint curve is the original for comparison:
Changing the direction and/or length of either handle changes the overall shape of the curve. After rotating and lengthening both handles, the curve now appears in an "S" shape.
The curve is now a bit "S" shaped, and that's because the bottom handle is controlling the angle and length of the curve as it flows out from the third anchor point, while the top handle is controlling the angle and length of the curve as it flows into the fourth point. Changing the length and/or direction of either handle will change the overall shape of the curve.
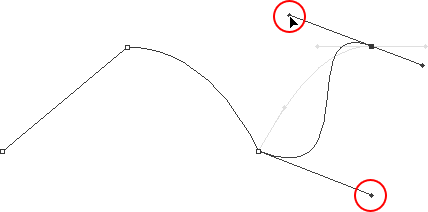
I'm going to press Ctrl+Alt+Z (Win) / Command+Option+Z (Mac) a couple of times to undo the changes I made, so the curve is once again in a simple arc shape as it was a moment ago, and I think I'll finish off this path with another straight segment, which means I'll need to remove that direction handle extending out from the right side of the fourth anchor point. We've already learned how to do that, by holding down Alt (Win) / Option (Mac) and clicking directly on the anchor point itself:
Hold down "Alt" (Win) / "Option" (Mac) and click directly on the anchor point to remove the direction handle on the right.
With the direction handle gone, all I need to do now to add a straight path segment is click to add another anchor point:
The direction handle on the right is now gone, so we can add a straight path segment simply by clicking to add another anchor point.
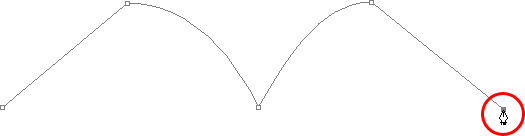
We could continue this path for as long as we wanted, adding more straight segments and curves, but I think we'll stop here because we've pretty much covered everything we need to know about drawing paths with the Pen Tool at this point. That was a lot of information to take in, especially if this is your first time learning about paths. As I mentioned at the beginning, you won't become a Pen Master simply by reading through this tutorial, just as you won't learn how to ride a bike, or drive a car, learn to swim, or play the piano simply by reading about it. But hopefully you have some sense at this point of how to draw paths with the Pen Tool, how to draw straight path segments, how to draw curves by dragging out direction handles, how to change the length and angle of the curve by rotating and resizing the handles, and how to combine straight and curved segments in a path.
To finish off our look at making selections with the Pen Tool, let's see a practical example of how to select an object with curves.
Here, we have a photo of a couple of dolphins leaping out of the water. Definitely a couple of very curvy creatures:

A photo of two dolphins jumping out of the water.
Let's say we want to select these dolphins so we can use them for a design or a collage, or whatever the case may be. If you were to try selecting them with the Lasso Tool, which is most likely what you would end up using if you didn't know how to use the Pen Tool, not only would you have a tough time, you'd have an even tougher time trying to convince yourself that you were happy with the results when you were done. The reason is because the Lasso Tool simply isn't capable of making curved selections very well. The biggest problem with it, besides being a pixel-based selection tool, is that it relies on you having a steady enough hand to move it smoothly around the curves. Even if you don't suffer from a caffeine addiction, you could drive yourself crazy trying to draw a perfectly smooth curve with your mouse, or even with a pen tablet, and when you've finally given up, you'll still be left with a selection full of rough, jagged edges that just scream "amateur!". No one likes to be called an amateur, especially when there's no need for it thanks to the Pen Tool!
Examine The Object First
Whenever you're about to select something with the Pen Tool, before you begin, take a moment to examine the object carefully to get a sense of where you're going to need to place your anchor points. Forget about all the details in the object and focus only on its shape. Where are the areas where the shape changes direction? Which parts of the shape are straight? Which parts are curved? If there's a curve, is it a smooth, continuous arc or does the angle change at a spot along the curve? Visualize in your mind where you're going to need to place your anchor points, because when you place one, you always want to be thinking about the next one and what the path segment between the two points needs to look like.
A Tool Of Elegance
One more thing to keep in mind is that the Pen Tool is meant to be a tool of elegance . It's not a nail gun or a staple gun. You don't want to just go clicking around your shape adding anchor points all "willy nilly" (that's a technical term). When using it to draw curves, you want those curves to be nice and smooth, otherwise we might as well just stick with the Lasso Tool. To keep the curves flowing smoothly, we need to limit the number of anchor points we use to create them. That's why you want to take a moment to examine the object first and visualize where the anchor points need to be. If you can outline a large section of the shape using only one curve with an anchor point on either end, that's what you want to do, because that's what's going to give you the kind of results you're looking for. The kind of results that scream "definitely not an amateur!".
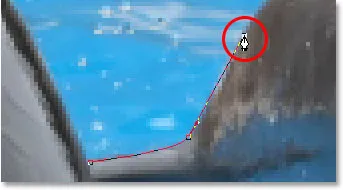
Let's select these dolphins. I'm going to start my path in the middle of the photo, at the spot where the side of the dolphin on the left overlaps the rear flipper of the dolphin on the right. There's no right or wrong place to begin a path. This is just where I've decided to start. The first part of that rear flipper is straight, so since I don't need a direction handle to create a straight path segment, I'm simply going to click once with my Pen Tool to add my first anchor point, which will serve as the starting point for my path:
Adding the first anchor point.
As I mentioned earlier, you'll probably find it helpful to zoom in on your image as you're drawing your path. To scroll the image around on the screen as you're zoomed in, hold down the spacebar, which will switch you temporarily to the Hand Tool and allow you to move the image around on the screen by clicking and dragging it.
The top of that flipper actually has a slight curve to it as it approaches the dolphin's tail section, so for my second anchor point, I'm going to click at the point where the flipper and tail section meet, and I'm going to drag out short direction handles, dragging up and to the right in the direction that the tail section is moving. Notice that I've now created a slight curve along the flipper:
Adding the second anchor point and dragging out small direction handles to add a slight curve to the first path segment.
As I continue up along the tail, I can see that it stays straight for a short distance, followed by a curve to the right, so I'm going to click to add a third anchor point at the spot where the curve begins. This gives me a straight path segment between the previous point and the new one. I know there's a short direction handle extending out from the previous anchor point, which normally means that my new path segment will be a curve, not a straight section, but because the handle is so short and is also moving in the same direction as the path segment, there is no noticeable curve to it. Consider it a "mostly straight" path segment:
Clicking to add the third anchor point, creating a (mostly) straight path segment.
Continuing along, we come to the first real curve in our path. For this, I'm going to need to drag out a direction handle from the anchor point I just added, so I'm going to hold down Alt (Win) / Option (Mac), then drag out a handle in the general direction where I want the curve to flow as it starts. Notice how I'm only dragging out a handle from the one side of the anchor point, not both:
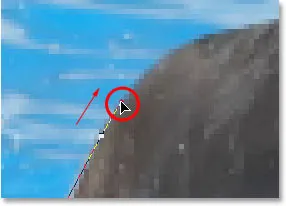
Hold "Alt" (Win) / "Option" (Mac) to drag out a direction handle from one side of an anchor point.
To add the curve, I'll click and drag at the spot where the curve ends, shaping the curve as I drag out the handles until it matches the curve of the dolphin's tail. If I needed to, I could also go back and change the length and direction of the handle at the start of the curve to fine-tune it, but in this case, I don't need to do that:
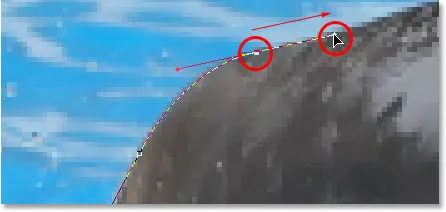
Adding an anchor point at the opposite end of the curve and dragging out direction handles from it, rotating and resizing them as needed until the curve matches the curve of the object.
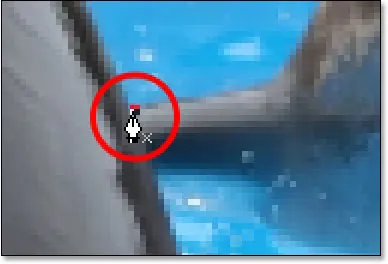
The next area of the dolphin is pretty straight, right up until its back begins to merge with its dorsal fin, at which point there's another curve, so I'm going to click to add an anchor point just before the curve up the dorsal fin begins, which is going to give me another "mostly straight" path segment between the previous point and the new point. Then I'm going to once again hold down Alt (Win) / Option (Mac) and drag out a direction handle as I prepare for my next path segment which will be curved:
Click to add an anchor point, then hold down "Alt" (Win) / "Option" (Mac) and drag out a direction handle to prepare for the next path segment.
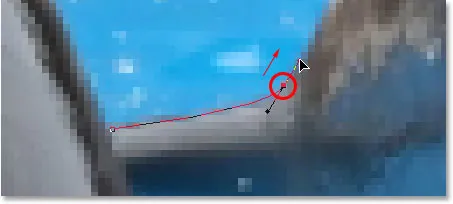
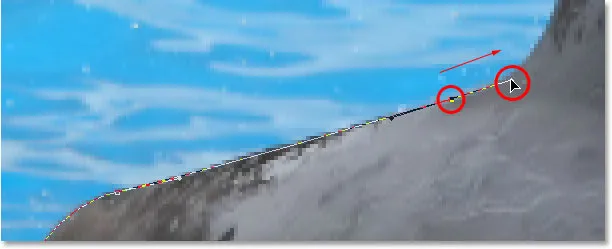
The left side of the dorsal fin consists mainly of one continuous curve upward until it gets near the very top, at which point the shape changes, so to create this curve, I'm going to click and drag at the point near the top where the curve will change direction. As we can see in the screenshot, this adds a curved path segment between the previous anchor point and the new one, but the curve is not yet following along the shape of the fin. It's going to need some fine-tuning:
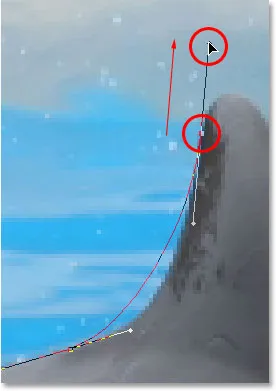
Adding a curve along the left side of the dorsal fin. The curve still needs some adjusting.
To adjust the curve, I'm simply going to hold down the Ctrl (Win) / Command (Mac) key, which gives me temporary access to the Direct Selection Tool, and I'm going to drag the handle extending out from the bottom anchor point towards the right to lengthen it, which is going to pull the angle of the curve in towards the right along with it, lining it up nicely with the curve of the fin. I've also rotated the top direction handles slightly in a clockwise direction just to be nit-picky, but the majority of the adjustment was done using the bottom direction handle:
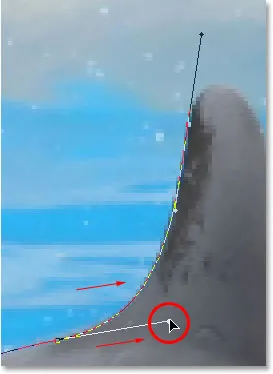
Adjust the curve by adjusting its direction handles.
To add a curve around the top of the fin, I'll click and drag on the opposite side of it to add another anchor point with short direction handles. Notice though that we run into a bit of a problem. The direction handle on the left side of the curve is too long and it's pulling the curve away from the top of the fin:
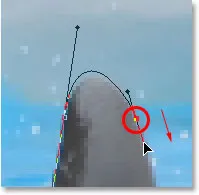
The direction handle on the left of the curve is too long, resulting in the curve not following the shape of the fin.
To fix that, all I need to do is once again hold down Ctrl (Win) / Command (Mac), then click on the end of the handle to select it and drag it shorter until the curve is the proper shape:
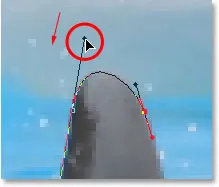
Shortening the length of the direction handle to adjust the shape of the curve.
Let's finish creating our path around the dorsal fin. The remainder of the fin is basically a straight line, so I'm going to click at the base of the fin to add another anchor point which adds the straight path segment, completing our path around the fin:
Adding an anchor point at the base of the fin to finish drawing the path around it.
Since you and I would both be here all day if I was to continue commenting on every anchor point, direction handle and path segment as we make our way slowly around the dolphins, and since we've covered everything we need to know at this point, I'm going to go ahead and draw the rest of the path, outlining both dolphins:
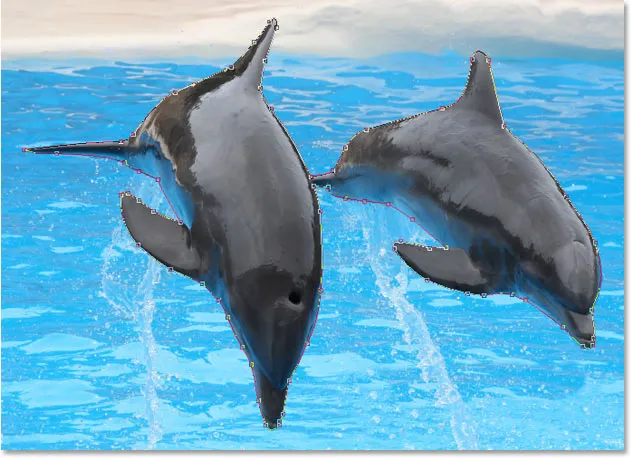
Both dolphins are now outlined by the path.
The dolphins have now been outlined with the path, and if we look at the Paths palette, we can see that sure enough, we have a path in the shape of the dolphins:
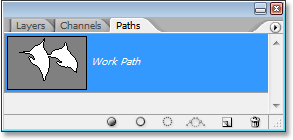
Photoshop's Paths palette showing the outline of the dolphins in the preview thumbnail.
As we've learned, Photoshop automatically names the path "Work Path", which means it's temporary and will be replaced if we start a new path. If you wanted to save it, you would need to double-click on the name "Work Path" and rename it to something else, like "Dolphins" in this case. I'm not going to worry about that, since I have no need to save it. All I want to do at this point is convert my path into a selection, and since I'm already in the Paths palette, I'll do that by clicking on the Load path as selection icon at the bottom of the palette:
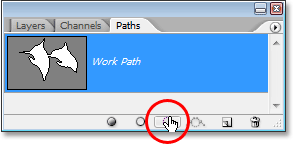
Clicking the "Load path as selection" icon at the bottom of the Paths palette.
I could also have used the keyboard shortcut Ctrl+Enter (Win) / Command+Return (Mac) . Either way converts my path into a selection, and if I look at my photo, I can see that my path has indeed become a selection around the dolphins:

The path around the dolphins has now been converted into a selection.
Kam ďalej?
A máme to! The dolphins are now selected and ready for whatever plans we have for them. And with that, we wrap up our look at drawing paths and making selections with the Pen Tool in Photoshop! Viac informácií o výberových nástrojoch Photoshopu nájdete v našej Príručke výberu v sérii Photoshop. Navštívte našu sekciu Photoshop Basics, kde nájdete ďalšie témy Photoshopu!